
The newly installed coil springs and shocks need a solid foundation in order to do their job effectively when out on the autocross course. In the BMW E36 platform this means replacing numerous rubber bushings (that have seen better days after 200k+ miles) with new bushings that are stiffer than stock. Bushings are basically the connectors between various hard parts in the suspension and the chassis/body. They allow slight movement and vibration absorption, thus providing a more comfortable ride, but still give a solid enough connection so that components stay located within alignment tolerances.
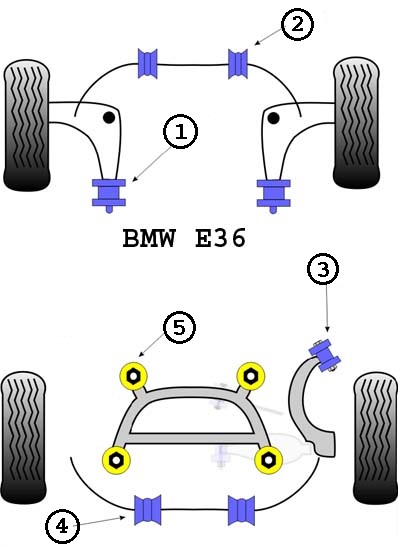
The performance bushing company, Powerflex, provides a great diagram (overhead view) that shows the most commonly replaced bushings in the BMW E36 chassis:
- Front Control Arm Bushing
- Front Sway Bar Bushing
- Rear Trailing Arm Bushing
- Rear Sway Bar Bushing
- Rear Subframe Bushing
I think Powerflex puts it very well on their website when describing the crucial nature of automotive bushings:
“Suspension bushings are one of the most highly stressed components fitted to a motor car. They undergo enormous strains in the most arduous of conditions with no maintenance or lubrication.”

The picture above shows a bushing that’s been through over 200,000 miles and 20 years. You can clearly see the cracked rubber around the entire perimeter. This bushing is not able to keep the suspension located properly and thus negatively affect the alignment of components. The next stage could be a total failure of the bushing where the center part of the bushing completely separates from the housing. As you can probably imagine, this would be extremely detrimental to performance!
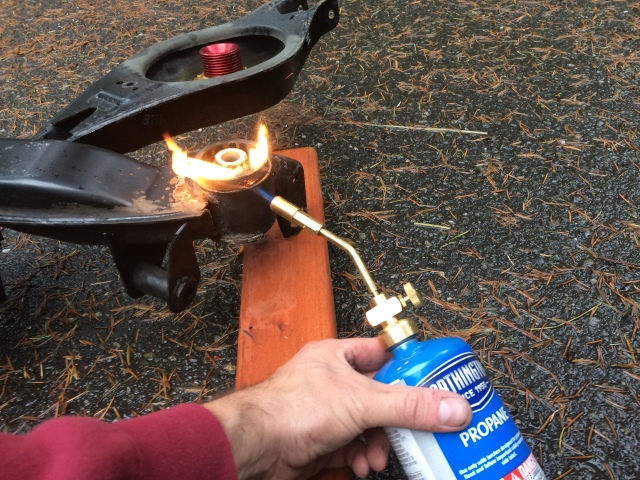
The tough part of bushing replacement is getting the bushings to come out of whatever component that they’ve been pressed into. At the BMW factory they would’ve used a hydraulic press to physically force the bushings into the pocket/housing. A BMW dealer repair center would also use a press and some special tools to extract the bushings. Since I have no press and don’t want to buy any special tools that would only be used a single time, it’s time for improvisation!
Heating up the housing around the rubber bushing with a propane torch actually works very well and is entertaining for kids at the same time! What you’re effectively doing is melting the rubber perimeter of the bushing until it turns into a gooey ooze and becomes responsive to the blows of a big hammer. The torch method works well for the rear subframe bushings.
The front control arm bushings and rear trailing arm bushings require a different method due to the thickness of the metal in the suspension component. I used a drill to completely perforate the bushing with numerous 1/4″ holes until the center section was barely hanging in there (sorry, no pictures). I could then fit in a reciprocating saw blade to cut the bushing metal housing in half which relieved the compression. Hammer blows then knocked it right out.

We finally have all the bushings out and it’s time for replacement with something much stiffer and more robust than the stock rubber units. I’ve mentioned Powerflex previously in this post so it’ll be no surprise that I’m using their polyurethane bushings as replacements. From their website:
“Polyurethane has been available as a specialized plastic for over thirty years. However, recent advances have made it possible to engineer very special properties into this exciting material.
The special type of polyurethane used by Powerflex is an advanced proprietary material which has unique properties. This ensures that each product not only offers the high-performance capabilities our customers expect, but also the exceptionally long life and quality they demand.
With the technological advances in this material it has been possible to overcome the common problem associated with harder bushings, which is increased noise. By correctly engineering the polyurethane compound, bushings can be made 25-30% stiffer than new rubber items but with exactly the same noise absorbing properties.“
Sounds good to me!
Polyurethane bushing installation is a pretty simple process. Clean up the suspension pocket, grease the bushings excessively with the supplied compound and push/pound them into place.
I’ve obviously glossed over a lot of big items with the teardown and re-installation of all the suspension components and the rear subframe. That’ll all be coming in a later update when I dig into the differential replacement as well. That was quite the undertaking as you will soon see!
However, at this point, we can now check off the necessary performance requirement of having a solid suspension foundation.
Vendor Links:
