
Racing a normal road-going car with stiffer suspension puts more stress onto the chassis than it was originally designed and this can cause cracks to develop near suspension mounting points. I previously took care of one prone area, the rear shock mounts, when I added the complete Ground Control Suspension kit. At least one large area still exists though, and it is much more difficult to address. In this post, I’ll discuss how I reinforced my E36 rear subframe mounting locations through bonding (not welding) in BMW factory steel stampings.

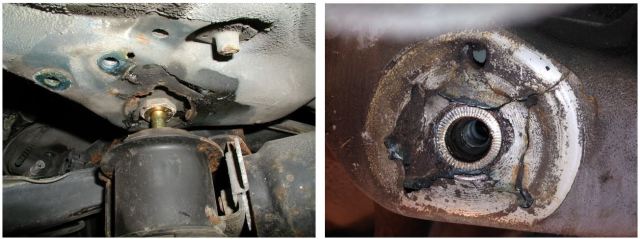
The rear subframe of the BMW E36 chassis provides mounting points for the suspension and the rear differential as seen in the picture above. I’ve highlighted the four rear subframe mounting locations where it attaches to the chassis. These four points can transmit a lot of force to the chassis and cause cracks to develop that require extensive work to properly repair. Here are some examples of the damage that can occur in a BMW E36 chassis without reinforcement:
The only issues with reinforcing the chassis are getting everything disassembled, prepped and attaching the reinforcements properly. Each of these steps can take a fair amount of time to complete properly.

The actual reinforcement steel stampings are manufactured by BMW, not third party sources. They are actually used in the factory/dealer repair of cracked E36 chassis mounting locations so BMW knows that this is an issue with the car. Since all BMW vendors use the same plates (to my knowledge), it doesn’t matter who you purchase through, you can just target the best price. I ended up purchasing online through AKG Motorsport as they had a great Black Friday deal and a couple other small parts that I needed for other projects.

As I noted in my last post, I completely dropped the rear suspension and subframe in order to swap in a new differential and upgrade the main replaceable rear bushings. The picture above shows a view from laying on the ground and looking up at what I saw once I got everything out of the way. Lots of dirt and grime have accumulated under there in 20+ years of road use! It’s crucial to get the areas where the plates mate with the chassis completely clean and ground down to bare metal.

After some degreasing with Simple Green and time with a wire brush mounted on my drill, I was very pleased to see that I had no visible cracks in any of the chassis mounting locations! I was actually a little surprised by this as I’ve heard that others out there had cracks even though they’d never raced their vehicle.

Things started looking pretty decent after a couple hours of laying under the car with wire brushes, towels, degreasing sprays, and other cleaning/polishing tools. I, however, was pretty well covered in everything that came off the car undercarriage! You can see though that the areas where the steel stamping reinforcements will cover are now completely down to bare metal.
The next part of my post will be the most controversial part for certain BMW E36 owners. The normal method for attaching the stamped steel reinforcements is welding them to the chassis. You weld the perimeter of the plate to the chassis after covering (or removing) parts of the undercarriage that are prone to burst into flames (such as the gas tank). I’m not a welder, I don’t know anyone who does weld well locally, and I don’t trust anyone to just show up to my house and start welding on my car without seeing them do something similar. For those reasons, I decided to pursue alternate plate attachment methods.

During my research I kept seeing a few others using specialized adhesives to bond the plates instead of welding. Adhesives more specialized than JB Weld (though that was has been used as well). In principle, bonding by adhesive seems to make sense because now you’re effectively bonding the entire steel stamping to the chassis evenly (thus supporting the load over a larger area) instead of just welding the perimeter of the plate to the chassis. After reading about various experiences and comparing adhesive datasheets, I decided to move forward with 3M Panel Bonding Adhesive 08115. Here’s 3M official Technical Data Packet on the adhesive:
3M Panel Bonding Adhesive 08115 – Technical Data PDF
It does specifically say that the adhesive is used with non-structural applications but I think given the large surface area, thickness of the steel stampings, and loading of the plate in only tension and compression (not side loads) that this will be strong enough for my purposes. Only time will tell though!

I applied the adhesive as directed by 3M. Basically just make sure a thin layer of adhesive is present on both surfaces to be bonded (i.e. the chassis and the stamped steel piece).
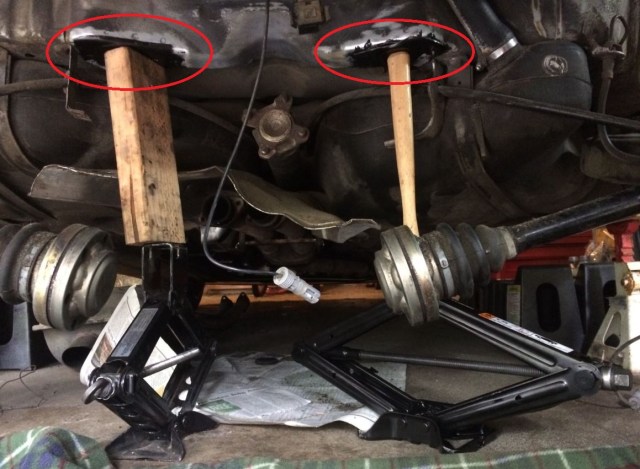
One of the keys to properly bonding the plates to the chassis is to make sure that when the epoxy is curing that the surfaces are pressed together. The easiest way that I thought to do this was by applying pressure through a couple of screw jacks that I had around. I placed a piece of wood on each jack and then increased the jack’s height until they started to take weight off of the jack stands. That means that there’s probably at least a couple hundred pounds of pressure on each plate pushing it up on the chassis. I let the car sit like this for 4 straight days even though it’s supposed to setup after 24 hours (being conservative as this is an important part). I also didn’t bolt the subframe back into the car for a full week after installation. Just taking further precautions.

While the adhesive was curing, I scraped any small surface rust over the subframe, spray painted it with black Rustoleum and then installed the new Powerflex subframe bushings.

I also cleaned all the hardware with degreaser and then put them in a bowl of Evapo-Rust ER004 rust remover to sit for a couple days. That stuff works amazingly! If you’ve never used it then I highly suggest giving it a shot. Once the pieces are rust free you can just put the solution back in the bottle and use it again for the next project.
That’s pretty much it with the transformation of the rear half of my 325is. Everything bolted back up great without issue, no strange sounds, and the car drives just fine. Only a few last odds and ends to tackle (along with getting the alignment done) and the car should be ready for the first event which is coming up quickly!
If you liked the information in this page, be sure to check out my Developments page for my most recent posts! Every single post is listed with a link on the Headquarters page.
Vendor Links:

Hi, how is this holding up? Also after prepping the mounting surfaces. What did you use to clean and prep the metal surface with? I’m thinking of using 3m dp420 black and it has surface prep instructions using aluminum etch, MEK, and degrease.
LikeLike
Aron, the reinforcements are holding up great with no issues. The metal plates are still holding fast like the first day with no shift at all and there are no cracks anywhere. For reference, it’s been a little over 3 years since I installed these. All I did to surface prep was to take the wire wheel to all parts as I mentioned in the post and then follow-up with brake cleaner for degreasing. Nothing special. Let me know if you have any other questions. Thanks!
LikeLike
Another year later, how is it again? Still just as good?
LikeLike
Still look like the first day that I installed them. No issues at all!
LikeLike
How much of the epoxy did you use for this, was one of the 200ml enough? I’m about to do this next week but not sure how much to buy. Thanks
LikeLike
Tom, it looks like I used about half of the 200ml tube during the install. Good luck!
LikeLike
Ahh nice! I was a little worried it need more than one, but i think I was overestimating the size of the plates. Thanks for this post and for the quick response
LikeLike
Hello, love your articles!!! Do you think these plates are sufficient? https://www.condorspeedshop.com/products/reinforcement-plates-rear-subframe-e36
LikeLike
Ethan, thanks for the comment and the link. I didn’t know that there were actually aftermarket alternatives to the OEM BMW reinforcement plates. After looking at the Condor plates, I notice that they’re just flat plates while the OEM BMW plates have compound curves that actually fit into the pockets of the chassis really well. I also see that the OEM BMW plates have thicker surfaces directly around where the subframe attachment bolts go through. I don’t know how much of that matters, but I personally would stick to the OEM BMW plates so that I have the most surface area for bonding (or welding).
Take a look at this picture to see what I’m talking about: https://www.fcpeuro.com/products/bmw-subframe-reinforcement-kit-e36-genuine-bmw-e36msub?ads_cmpid=1586640911&ads_adid=59893888775&ads_matchtype=&ads_network=g&ads_creative=298302526031&utm_term=&ads_targetid=aud-1020666087795:pla-327620319311&utm_campaign=&utm_source=adwords&utm_medium=ppc&ttv=2&gclid=Cj0KCQjwxJqHBhC4ARIsAChq4atJPwtxYJt6Qi9KgzeRVN0c4_iBvOb7iN1F9hXSt52JEO2Z1Mm-JPsaAv_YEALw_wcB
LikeLike
I just panel bonded my reinforcement plates in.your website was one of the reasons i decided to go this route… and cause the e46 repair manual says to do the same… How are yours holding up 6 years later with the extra power?
LikeLike
The chassis and reinforcement plates still look the exact same as the first day that I installed them. No issues whatsoever. Even though I can now weld pretty proficiently, I will still choose to these reinforcement plates in the same way today!
LikeLike
Did you ever do the trailing arm reinforcements?
LikeLike
Yes, but there’s no way that those can be bonded in. There’s just not enough surface contact between the plates and the chassis. I welded those in myself.
LikeLike